berry (3) birthdays (3) bread (2) breakfast (1) cake (6) Caramel (1) cheese (2) chocolate (5) cookies (1) cupcake (3) dessert (4) dr. seuss (1) drink (6) egg (1) Freezer Meals (2) fruit (2) giveaway (19) Holidays (18) kids (4) no bake (1) party food (1) Peanut Butter (1) potato (2) Salad (3) sauce (4) snacks (2) Star Wars (4) Strawberry (1) vegetables (2)

October 30, 2008

Mummies for Dinner

I LOVE to do fun and spooky recipes for our family Halloween Dinner. This year was a little different. Due to scheduling conflicts we had our Family Halloween Dinner a couple nights early. It was also different because I wasn't feeling great the day of, so we had the food, but not the excitement leading up to it, and no spooky table decor. The boys were a BIG help! So, simple as it was, here was our menu:

Mummy Pizzas

Mummy Toes and Fingers

Mummy Guts and Teeth

I Love to get recipes from Family Fun. They have great ideas for kid crafts, costumes, decorations, and recipes. Check it out!

So here are the recipes I used. I did change each of them, just slightly.

Mummy Finger and Toes
Recipe Ingredients:

Cocktail wieners
2 pkgs. Refrigerated Crescent Rolls
Ketchup or mustard

Directions
1. Heat the oven to 375 degrees.

2. Roll out crescent dough, but don't separate it into triangles, keep them in rectangles (4 rectangles per package). Pinch seams together. Cut them into 3/4 inch wide strips.

3. Roll each wiener in a dough strip.

4. Bake for 10 to 13 minutes.

I didn't do this, but should have- Before baking, cut a wedge into the end of each cocktail wiener to make a toenail. After baking, 
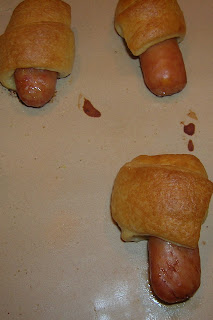
fill the toenail with ketchup or mustard.
When I got to the last rectangle of dough I had more wieners than dough. So I actually cut the dough in half, and made smaller rolls. I think this actually looked better. They weren't so fat when they baked. But... then you would have more dough than toes...? Just a side note.

I used The Pampered Chef Cutting Board to measure and the Pizza Cutter to cut the dough strips. I baked them on a flat stone, of course.


Mummy Pizzas
Ingredients:

English muffins
Pizza sauce
Black olives
Scallions
Red or green pepper
Cheese

Step 1 Heat the oven to 350° F. For each mummy, spread a tablespoon of pizza sauce onto half of an English muffin (toast it first, if you like).

Step 2 Set olive slices in place for eyes and add round slices of green onion or bits of red or green pepper for pupils. ( I didn't do this)

Step 3 Lay strips of cheese across the muffin for the mummy's wrappings.

Step 4 Bake for about 10 minutes or until the cheese is melted and the muffin is toasty.

I used the Small Scoop to scoop and spread the sauce. I grated some Parmesan Cheese over the sauce using the Rotary Grater, and added some Canadian bacon. Then continued with the face. For the cheese I used the Cheese Knife to cut it into strips. The recipe also said you could use string cheese and just peel it apart. We used the Egg Slicer Plus to slice the olives. And baked it on the new Round Stone .


I can't find where I got the drink recipe from, but I did my own version anyway.


Mummy Guts and Teeth

Ingredients:

Apple Juice or Cider
Apple- Peeled, cored, sliced, and cut
Seedless Grapes- cut in half

In a punch bowl, combine the Apple Juice, cut up apple and grapes. Add ice, if desired.

The apples should look like teeth and the grapes like eyeballs, we said guts, since our pizzas had olive eyes.

I used the Apple Peeler/Corer/Slicer to prepare the apple. Then cut it into wedges for the teeth. I used the peel of the apple to drape in and out of the bowl. Cool huh? I thought I was clever!

I used the Trifle Bowl for the punch bowl. Since it is clear you can see all the "goods".

October 25, 2008

CHOCOLATE!!!

OMG!!!! We just made one of the BEST desserts I've ever tasted!! It is the Peanut Butter Cup Torte. I always enjoy trying the new recipes. My family enjoys it too!


IF you are a chocolate and Peanut Butter Lover or Chocolate and Caramel, you will definitely LOVE these recipes. If not, you will like it after trying these!


Chocolate Peanut Butter Torte
The classic combination of peanut butter and chocolate comes together for a decadent, over-the-top torte.


Ingredients
Nonstick cooking spray with flour
1 pkg (18-21 oz) traditional or chewy brownie mix
3 eggs
½ cup plus 1 tbsp vegetable oil, divided
¼ cup water
¼ cup creamy peanut butter
6 pkg (1.5 oz each) peanut butter cup candies
1 bag (10 oz) peanut butter morsels (12/3 cups)
2 cups mini marshmallows

1. Preheat oven to 350°F. Spray Torte Pans with nonstick cooking spray with flour. Place 8-in. circles of Parchment Paper over centers of pans; set aside. In Stainless (4-qt.) Mixing Bowl, combine brownie mix, eggs, ½ cup of the oil, water and peanut butter; mix well. Divide batter between pans, spreading to edges. Bake 10-12 minutes or until centers feel firm to the touch.

2. Meanwhile, using Utility Knife, dice peanut butter cups; set aside. In Classic Batter Bowl, combine peanut butter morsels and remaining 1 tbsp oil; microwave on HIGH 1-2 minutes or until melted and smooth, stirring after each 30-second interval. Spoon ¼ cup of the peanut butter mixture into resealable plastic bag; set aside. Fold marshmallows into remaining peanut butter mixture.

3. Remove pans from oven to Stackable Cooling Rack; let brownies stand in pans 4 minutes. To assemble torte, invert one brownie well-side up onto Simple Additions® Large Round Platter. Using Classic Scraper, spread marshmallow filling into brownie well. Invert remaining brownie well-side up onto cooling rack; slide onto bottom layer. Evenly distribute diced peanut butter cups into brownie well. Trim corner of filled bag with Utility Knife to allow peanut butter mixture to flow through; drizzle over torte. Serve immediately.
Yield: 16 servings
Nutrients per serving: Calories 470, Total Fat 24 g, Saturated Fat 10 g, Cholesterol 40 mg, Carbohydrate 53 g, Protein 10 g, Sodium 250 mg, Fiber 2 g
©The Pampered Chef, Ltd., 2008


Warm Nutty Caramel Brownies

All nut topping, chocolate caramel candies and a chocolate drizzle top these decadent brownies with a hidden candy surprise.

1 teaspoon vegetable oil
1 package (12 ounces) semi-sweet chocolate morsels, divided
1 package (18-21 ounces) brownie mix (plus ingredients to make cake-like brownies)
¾ cup packed brown sugar, divided
1 cup salted mixed nuts, divided
5 rolls (1.7 ounces each) milk chocolate-covered chewy caramels, divided (40 pieces total)
Vanilla ice cream (optional)

1. Preheat oven to 375°F. Lightly brush Large Bar Pan with oil using Chef’s Silicone Basting Brush. Chop 1½ cups of the chocolate morsels using Food Chopper. In Classic Batter Bowl, combine brownie mix, water, oil, eggs and ¼ cup of the brown sugar; mix well. Fold in chopped chocolate; pour batter into bar pan, spreading evenly using Small Mix ‘N Scraper®.

2. Chop nuts using Food Chopper. Combine half of the nuts and remaining ½ cup brown sugar; sprinkle evenly over brownie batter. Bake 20-22 minutes or until wooden pick inserted in center comes out clean.

3. Meanwhile, using Utility Knife, cut 16 caramels into quarters. Place remaining ½ cup chocolate morsels in Prep Bowl; microwave on HIGH 1 minute or until melted, stirring after each 20-second interval. Spoon melted chocolate into resealable plastic bag; set aside.

4. Remove bar pan from oven to Stackable Cooling Rack. Immediately press remaining 24 caramels evenly into brownie in four rows of six caramels each. Sprinkle quartered caramels and remaining nuts over brownies. Trim corner of chocolate-filled bag with Utility Knife; drizzle chocolate evenly over brownies. Cut into squares; serve warm using Mini-Serving Spatula. Serve with ice cream, if desired.
Yield: 24 servings
Nutrients per serving: Calories 310, Total Fat 16 g, Saturated Fat 3.5 g, Cholesterol 25 mg, Carbohydrate 38 g, Protein 2 g, Sodium 135 mg, Fiber less than 1 g
©The Pampered Chef, Ltd., 2007

Please excuse my terrible photography. This is how ours turned out. I loved that my son was able to help! This recipe was SO simple! I love it when my boys cook with me! We all have fun.

October 21, 2008

Strawberry Spinach Salad

I read a blog about a Strawberry Spinach Salad and had to share my favorite recipe.

Strawberry Spinach Salad

Dressing

1 lemon
2 Tbsp. white wine vinegar
1/3 C sugar
1 Tbsp. vegetable oil
1 tsp. poppy seeds

Salad
1/4 C sliced natural almonds, toasted
8 oz. (1 1/2 C) strawberries, hulled and quartered
1/2 medium cucumber, sliced and cut in half
1/4 small red onion, sliced into thing wedges (1/4 C)
1 pkg. (6 oz.) baby spinach leaves

1. For dressing, zest lemon using Zester/Scorer to measure 1/2 teaspoon zest. Juice lemon using Juicer to measure 2 Tbsp. juice. Combine zest, juice, vinegar, sugar, oil and poppy seeds in Measure, Mix, & Pour. Blend; Cover; refrigerate until ready to use.

2. Preheat oven to 350 F. For salad, spread almonds in single layer over bottom of Small Bar Pan. Bake 10-12 min. or until lightly toasted. Remove from oven; cool almonds in bar pan.

3. Meanwhile hull strawberries using Core & More; cut strawberries into quarters.

4. Score cucumber using Zester/Scorer; remove seeds using The Corer. Using the Ultimate Mandoline fitted with v-shape blade, slice cucumber; cut slices in half. Slice onion into thin wedges.

5. Place spinach in Bamboo Bowl ; add strawberries, cucumber and onion. Stir dressing; pour over salad, gently tossing to coat using Bamboo Salad Tongs. Sprinkle with almonds. Serve immediately.

Yield: 10 servings

LOW FAT Nutrients per serving (1 cup): Calories 70, Total Fat 3 g, Saturated Fat 0 g, Cholesterol 0 mg, Carbohydrate 10 g, protein 1 g, Sodium 15 mg, Fiber 1 g

Cook's Tips:
I like to use the Egg Slicer Plus to slice the strawberries instead of just quarter them.
You can sprinkle some brown sugar over the almonds to give them texture and a sweet taste. You can also put the almonds and Small Bar Pan in microwave for about 3min. to toast.
For thinner onion slices use the Ultimate Mandoline with the adjustable slicing blade.
We also carry Large Square Bowl or Dots Large Round Bowl, which are GREAT for salads too!

October 16, 2008

Homemade For The Holidays

Once a month I get together with some other consultants to discuss business. We do some training from the home office, practice recipes, and give each other business tips. We enjoyed our meeting this week! I wanted to share with you what we practiced making. It was so fun, and will make a GREAT holiday show! These are fun things to do with kids, or hand out to neighbors, or have for a holiday party!

The first recipe we practiced was Candy Cane Brownie Lollipops. Here is picture of what mine looked like... be nice, the problem is more my lack of photography skills.

Here are some tips for Candy Cane Brownie Lollipops
• To keep the lollipops secure on their sticks, dip all of the brownie and
about ¼ inch of the candy cane into the melted bark.
• If desired, lollipop sticks or stick candies can be substituted for the
candy canes. For appearance sake, they look better if all the sticks are the same length.
• White almond bark can be substituted for the chocolate bark.
• From The Pampered Chef® Festive Holiday Desserts Recipe Collection.

The next recipe we tried was the Raspberry Mousse Cookie Nepoleans. I didn't get a picture of these.

Tips for Raspberry Mousse Cookie Napoleons
• The cookies will absorb moisture from the mousse, making
them soft and cakelike. These are three layers, so they are large. We had to eat them in sections. • You could use other flavors like strawberry, mint, or tangerines/ orange.

One of the consultants pre-made Peppermint Fudge Cookie Sandwiches for all of us to see and try. Sandwiching a creamy peppermint patty between warm brownie cookies creates an irresistible sweet treat.

I definitely had a fill of chocolate (and peppermint) that night! Boy was it delish!

I am so excited to do these recipes at a class or show!

October 14, 2008

Whole Wheat White Bread

On Saturday I made Whole Wheat White Bread. I started it a little late, and because it was so cold, it took a while to rise. I actually fell asleep on the couch while it was baking, and let it bake an extra 15 minutes. It was in my stoneware loaf pan, so it didn't burn, of course!

Whole Wheat White Bread
from- Carolyn Hagerman

1 package yeast
1/4 cup lukewarm water
2 1/2 cups hot water
1/2 cup powdered milk
1/2 cup brown sugar
3 teaspoons salt
1/4 cup shortening (melted) or oil

3 cups sifted whole wheat flour
5 cups sifted all-purpose white flour


Soften yeast in 1/4 cup warm water (110 degrees). Combine hot water, milk, sugar, salt, shortening or oil, cool to lukewarm. Stir in whole wheat flour and 1 cup white flour, beat well. Stir in softened yeast. Add enough of the remaining flour to make a moderately stiff dough. Turn out on lightly floured surface, knead until smooth and satiny (10-12 minutes). Shape into a ball, place in lightly greased bowl, turning once to grease surface. Cover and let rise in warm place til double in bulk (about 1 1/2 hours). (You can hurry this rising a bit by placing bread in oven. Preheat oven to 200 degrees and then turn off and put bread in.) Punch down. Cut in 2 portions, shape each into a smooth ball. Cover and let rest 10 minutes. Shape into loaves, place in greased bread pans. Let rise until double (1 1/4 hours). Bake in moderate oven 375 degrees about 45 minutes. Cover with foil the last 20 minutes if necessary. Makes 2 loaves. Great toasted.


My tips:

I used Prep Bowls to soften the yeast.

I mixed it in my Kitchen aide mixer with whisk attachment. After stirring in yeast I switched to dough hook attachment. I was able to add all the flour, and continue to knead with the dough hook, instead of by hand.

After putting in greased bowl, I microwaved for 15 seconds, turned the dough ball, then microwaved for another 15 seconds.

When in the loaf pans I used the warm oven to help it rise, it worked a lot faster.

I used the Stoneware Loaf Pan to bake the loaves of bread.

I think covering with foil for last 20 minutes is a good idea. If only I hadn't fallen asleep.

I will try this recipe again!